TR4A Issues that have touched this project
Known Issues.
This is where you'll find issues relating to the TR4A IRS and any fixes we've found. Theses are issues we have been faced with. Hope it helps.
This is where you'll find issues relating to the TR4A IRS and any fixes we've found. Theses are issues we have been faced with. Hope it helps.
|
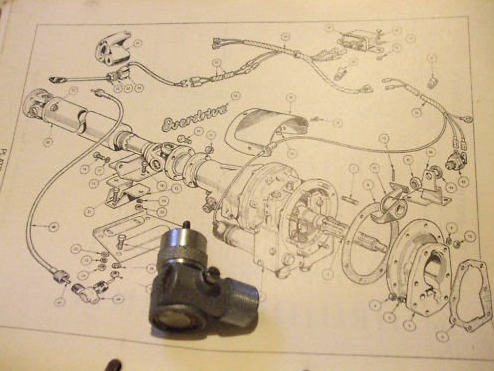
TR4A Speedo Angle Drive.
If ever there has been a task on a vehicle made so difficult that you consider jumping in to a bucket of ice, this is it. In fact it is not actually possible to change the angle-drive from below. It will take you a while to work this out if you try. In the end it took removal of the gearbox tunnel to get at it. So that means taking out all of the seats, carpets etc. I made an inspection hatch on the tunnel so if it ever happens again I can get to it from the inside of the car with ease. I did see a gearbox tunnel with a hatch in metal once but have never seen one again. As we rebuild the car this will be given a lot of attention. When you buy a new angle drive you get a copper washer with it. Make sure you use it as the drive fails quite quickly without it and then you have to go through the whole show again. |
|
|
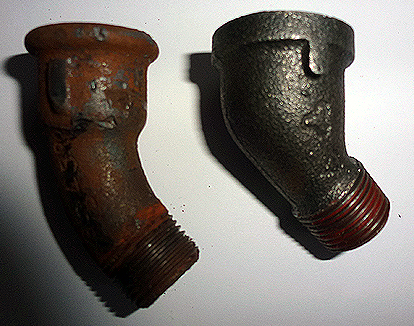
Aftermarket Heater Elbow
From the head to the heater valve/switch you find an elbow. Trying to take out and old valve saw the alloy valve crack and get stuck in the original elbow. So I thought for £9 let’s buy a replacement from Rimmer Brothers. The replacement is a very different size and design as the picture shows. It’s on the right. What this means is that it hits the head nut and you cant turn the valve to get it secured down. To use this part you need to remove the head nut, insert the elbow then replace the head nut and torque it down. What a faff!!! I decided that a new plan was needed and sent the elbow to Carl Fitchet at TR Trader who heated up the elbow with his welding torch and then blew out the melted ally with an airline. He then posted it back all for a drink when I next see him! Rimmer Brothers did not charge me for the part and said no need to send it back. On the left the original part. On the right the aftermarket part - Big difference. If you can reuse your original elbow it is probably best. |
|
Rear hubs not seating
When trying to refit the rear hubs in the IRS trailing arm they appeared to be getting stuck on the studs. As if the studs were bent. It actually turned out to be the powder coating paint build up in the trailing arm. Using a Dremmel tool, the paint was removed from the inner edge and the hub fitted like a glove.
Brake calliper rubbing on brake disc
After a complete rebuild of the front end suspension the brake calliper touched the disc when reassembled. The culprit turned out to be the felt seal in the wheel bearing. I had not tightened it up enough to compress the felt. Best advice is to be heavy handed and really tighten up the front hub as much as you can. Then slacken off a turn so the hub rotates freely. This should compress the felt enabling the brake calliper to sit correctly with a uniform gap both sides of the brake disc. Remember to soak the felt seal in engine oil for 24 hours before fitting. This will also help with the compression of the seal. It is also worth noting that the aftermarket felt seals are a single unit with the felt glued in to the metal outer casing whereas the standard part was 2 separate items. Some people have shaved down the aftermarket felt seals but if you soak it properly in oil and compress it had it should not need altering to fit.
